

Ukulele chords are essential to get started with the ukulele and to improve your ukulele chord playing skills. This guide contains instructions for playing all the most common ukulele chords, along with a useful ukulele chord chart containing 180 entries. Don’t feel as if you need to memorize them all at one time! Once you’ve learned how to play just a few easy ukulele chords, you’ll be ready to work on your strumming technique – and soon enough, you’ll be ready to play your favorite songs!
Ukulele Chord Chart – PDF
Printable ukulele chords![]()
About Our Ukulele Chord Chart
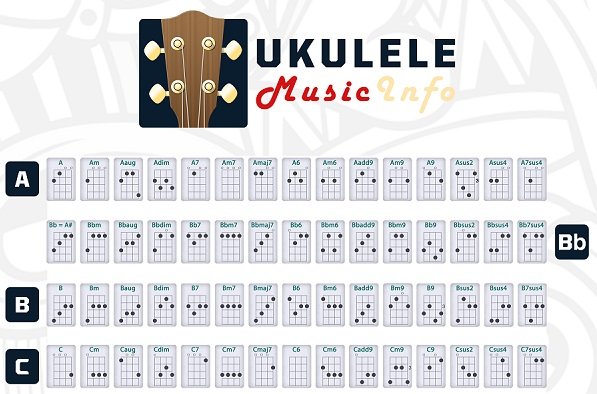
Our printable ukulele chord chart familiarizes you with over 180 ukulele diagrams. Not only will you find ukulele chords for standard tuning (GCEA) here, you’ll also find chords for less common keys. Check our ukulele chord chart next time you need to learn:
* Minor ukulele chords
* Major ukulele chords
* Augmented ukulele chords
* Diminished ukulele chords
* Sixth ukulele chords
* Seventh ukulele chords
* Ninth ukulele chords
* Suspended ukulele chords
* Added ukulele chords
This ukulele chord diagram chart includes all keys:
* A
* B♭ / A#
* B
* C
* D♭ / C#
* D
* E♭ / D#
* E
* F
* G♭ / F#
* G
* A♭ / G1
How to Read Ukulele Chord Diagrams
Are you new to the ukulele, and feeling a little bit lost? Don’t worry! It’s not at all difficult to read chord diagrams – and every expert was once a new player like you are. Once you’ve learned the basics, you’ll feel like you know a whole new language: The language of ukulele music! This printable chord chart is easy to read once you know what you’re looking at.
Take a look at a chord chart, and you’ll notice that the chart reminds you of the pattern you see when you look at your ukulele’s neck. Each vertical line represents a string, and each horizontal line represents a fret. Horizontal lines without numbers represent frets one through four, with the ukulele’s headstock at the top. If you see a number next to a horizontal line, that number represents a fret a bit further along the fretboard.
You might see open circles at the tops of some vertical lines. Open circles mean that you should leave that string “open” and not touch it as you create the chord. Black dots on vertical lines show you where to place your fingers. Some chords have “X” symbols at the top of the vertical lines. If there is an “X” symbol you should rest your finger on top of it without pushing down on the fret to mute the string.
Take a peek at the very first chord on our chart. This “A” chord is easy to play as illustrated. Cover the first string (G) with your index finger at the second fret, and cover the second string (C) with your middle finger at the first fret. Leave the last two strings open. Now strum. You just played an “A” chord!
When you are reading ukulele music, you might notice that some versions feature a thick line at the top of some chords. Don’t let this confuse you: It represents the ukulele’s nut, which is located above all the frets. The thick line at the top of some chords is also a way to display that you are viewing the chord chart that shows frets 1 to 4 on your instrument.
Some ukulele chord diagrams include numbers at the bottom of each illustration. These simply tell you which finger to use when playing the chord in question.
* 1 = Use your index finger
* 2 = use your middle finger
* 3 = use your ring finger
* 4 = use your pinkie
Tips for Getting Started with Ukulele Chords
Be sure to tune your ukulele before you start learning new chords. You might have purchased a tuner along with your ukulele, or you may prefer to use a ukulele tuning app. Either way, be sure that you tune each string. Once you’ve completed this task (believe us, it gets a lot faster and easier with a little bit of practice!) you’ll be ready to start playing some chords.
If your chords sound like they’re a bit off, check to be sure that your fingers are positioned on the frets, and ensure that you are not touching or muting strings that should be left open, or vice-versa. If your finger positioning is correct, double-check your tuning. If you’ve been practicing for a little while and your ukulele is brand-new, then it’s possible that your strings might be in the breaking-in phase, which means you’ll have to tune more often until they’re finished stretching. Don’t worry – the problem is only temporary!
Ukulele Strumming: How to Get Started
If you’re a beginner, then you might be wondering how to strum the ukulele. Here are just a few basics:
* Before strumming your ukulele, position your hand between the sound hole and the instrument’s neck. Try different positions on your uke to see what sounds best to you!
* Down Strum: In order to strum down,start by curving your hand. Next, strum the string with your index finger. You may also use a plectrum or your thumbnail. Strum up with the tip of your finger, or with a plectrum, if you prefer. Use your wrist like a pendulum instead of moving your whole arm, and you’ll have more stamina to last through your practice session!
* Listen to lots of ukulele music, and you’ll soon notice that different strumming patterns create different sounds and textures within the music. Sometimes you’ll hear steady up and down strumming, and sometimes you’ll hear more ups than downs. Sometimes you’ll hear skipped strums or percussive thumps. Play around with your technique! Your strumming style will add plenty of flair to your music. Once you’ve learned the basics you’ll be ready for some advanced strumming techniques such as reggae strums, half-bar patterns, two-bar patterns, and more.
Be sure to learn the ukulele chord patterns you need for each song before you start strumming. It might be slow going at first, but with just a little bit of practice, you’ll playing lots of popular songs. And in case you’re not already the life of the party, you may soon be! Happy playing!